
I spent two hours last week manually cleaning contact form submissions. Extra spaces everywhere, emails in ALL CAPS, phone numbers missing country codes—you know the drill. Then I remembered n8n has expressions built in.
Twenty minutes later? All of it automated. Here’s exactly how n8n expressions work and how to use them to transform messy data into clean, structured information.
Watch the Video Tutorial
Want to see this workflow in action? Watch the complete step-by-step tutorial:
Prefer reading? Keep scrolling for the written guide with all screenshots and code.
What is an n8n Expression?
An expression is code inside {{ }} brackets that lets you access and manipulate data as it flows through your workflow.
Simple example:
- Your data: { “name”: “John”, “age”: 30 }
- Expression: {{ $json.name }} returns “John”
- Expression: {{ $json.age + 5 }} returns 35
Think of expressions as reaching into your data and pulling out exactly what you need—or changing it on the fly.

What is Data Transformation?
Data transformation is converting data from one format or structure to another so the next step in your workflow can use it.
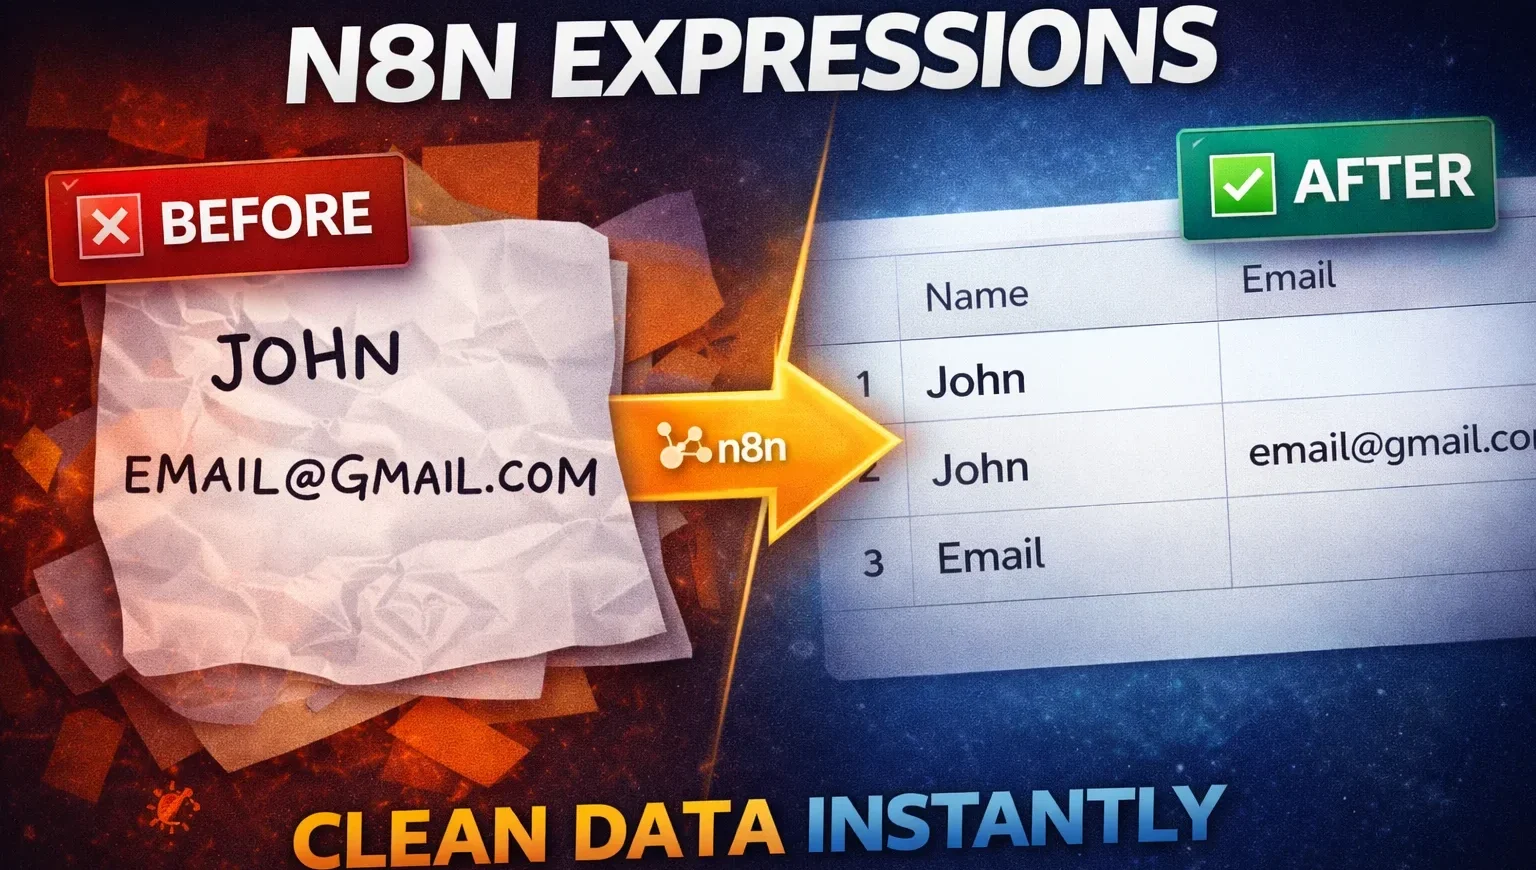
Real example from a contact form:
- Before: { “first_name”: “john”, “last_name”: “DOE” }
- After: { “full_name”: “John Doe” }
The data didn’t disappear—it just changed shape. That’s transformation.
What You’ll Need
Before we start:
- n8n installed (self-hosted or n8n.cloud account)
- Google Sheets account (free tier works fine)
- Basic understanding of n8n nodes (covered in [Post #2: Understanding n8n Interface])
- 20-30 minutes to follow along
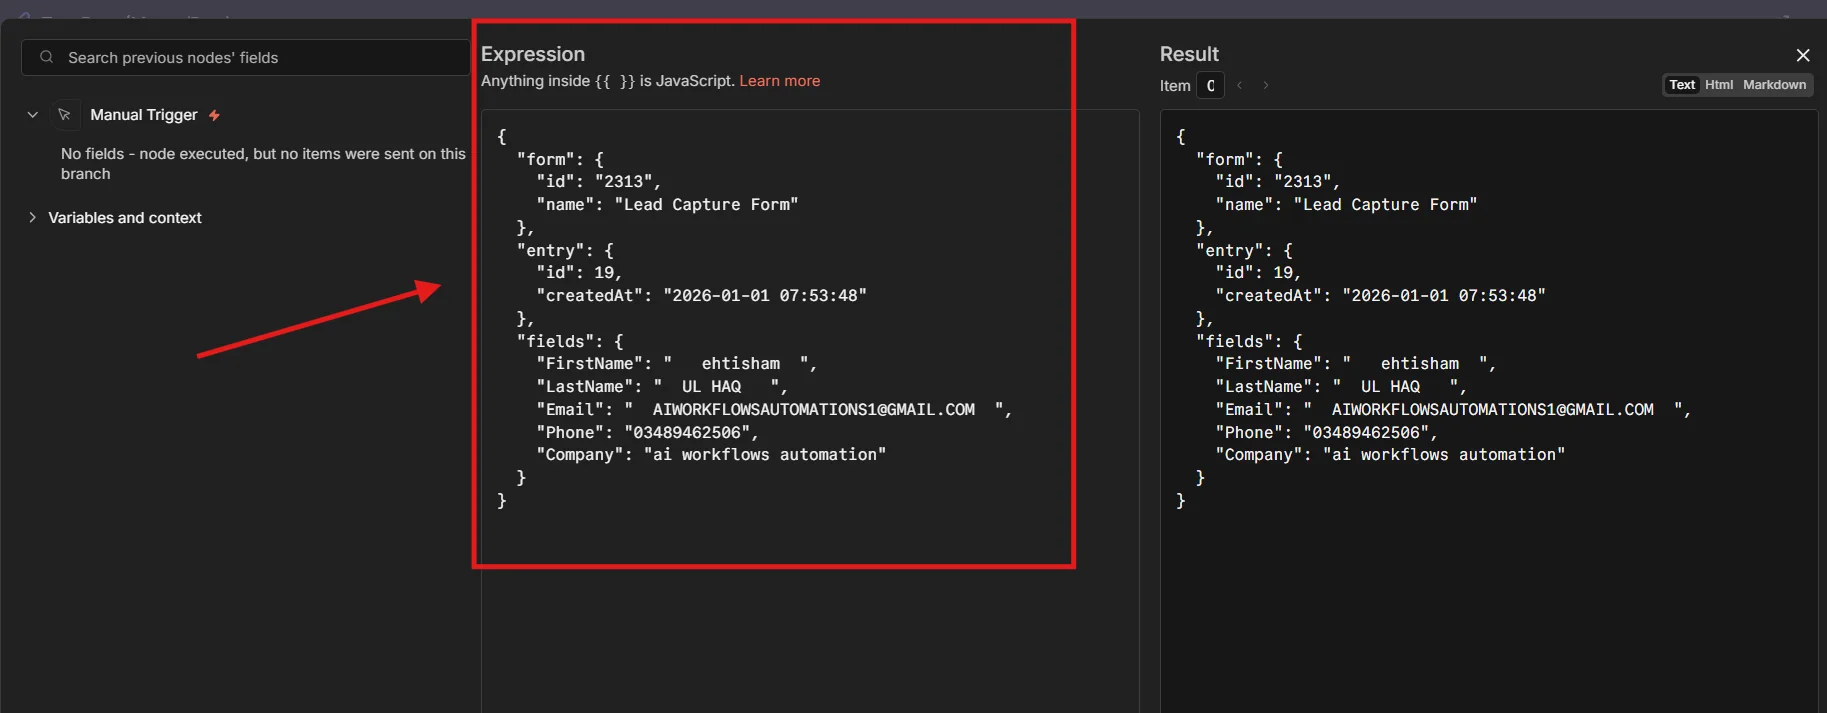
The Problem: Messy Contact Form Data
Here’s what real contact form data looks like when it hits your system:
FirstName: ” ehtisham ” (extra spaces)
LastName: “UL HAQ ” (ALL CAPS, trailing spaces)
Email: ” AIWORKFLOWSAUTOMATIONS@GMAIL.COM ” (uppercase, spaces everywhere)
Phone: “03489462506” (missing country code)
Company: “ai workflows automation” (inconsistent capitalization)
This messy data breaks automations, looks unprofessional in spreadsheets, and causes duplicate records. We need to clean it automatically.
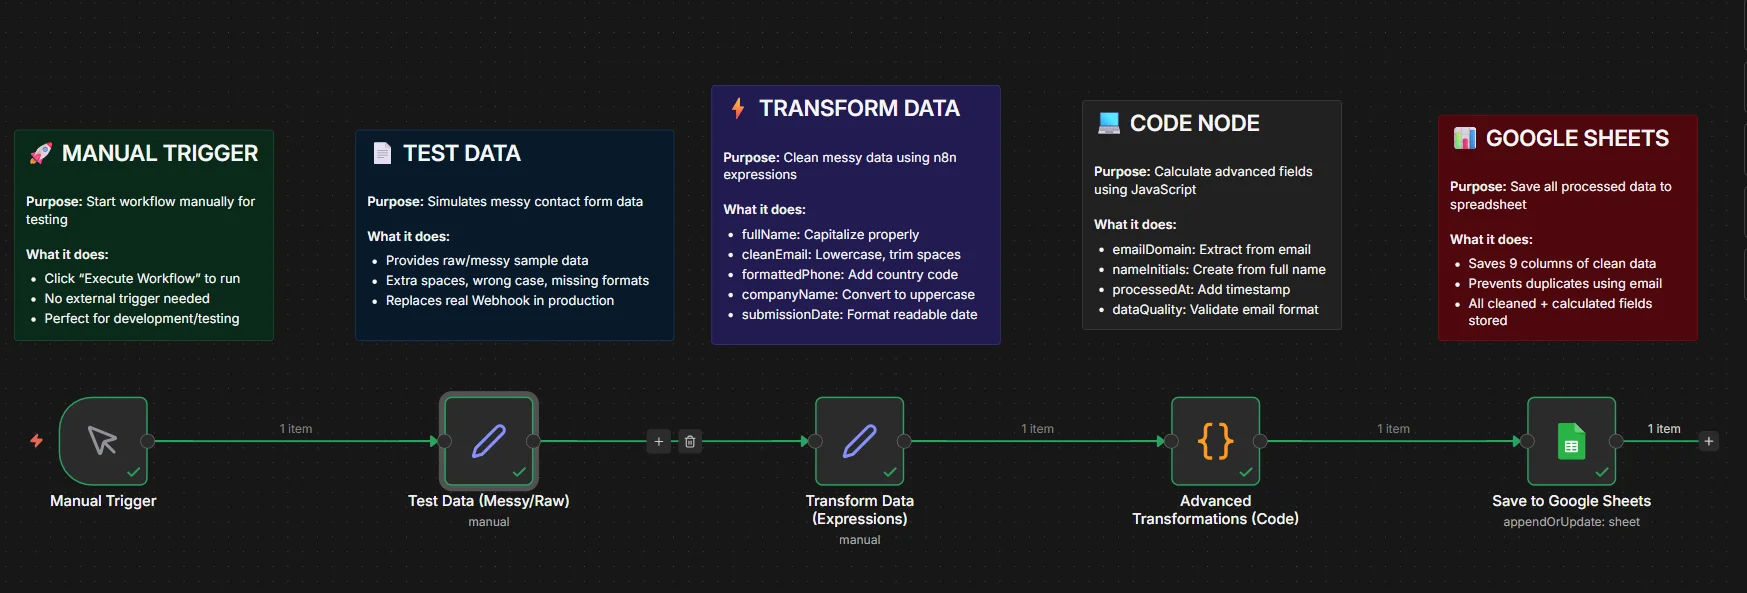
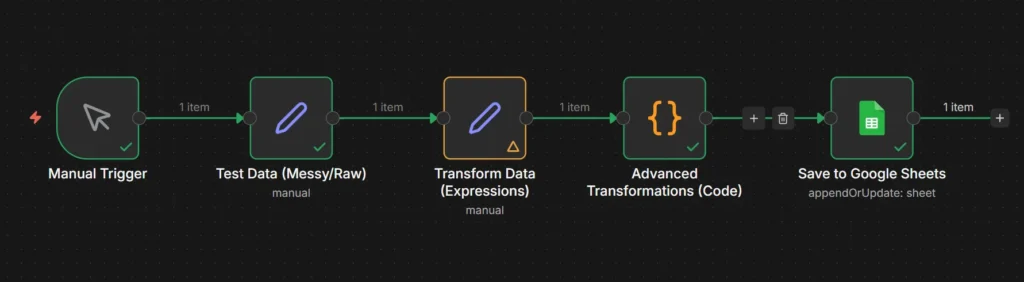
Building the Data Transformation Workflow
Step 1: Setup Manual Trigger
Start with a Manual Trigger so you can test everything without needing real form submissions. Click the plus icon, search for “Manual Trigger,” and add it to your canvas.
Step 2: Add Test Data (Simulates Messy Input)
Add a Set node and name it “Test Data (Messy/Raw).” This simulates what a contact form would send.
Configuration:
- Field Name: body
- Type: Object (important!)
- Value: Your messy test data
The “Object” type tells n8n to treat this as JSON structure, not plain text. That’s critical for the expressions to work.

Step 3: Transform Data Using Expressions
Here’s where expressions do their magic. Add another Set node called “Transform Data (Expressions).”
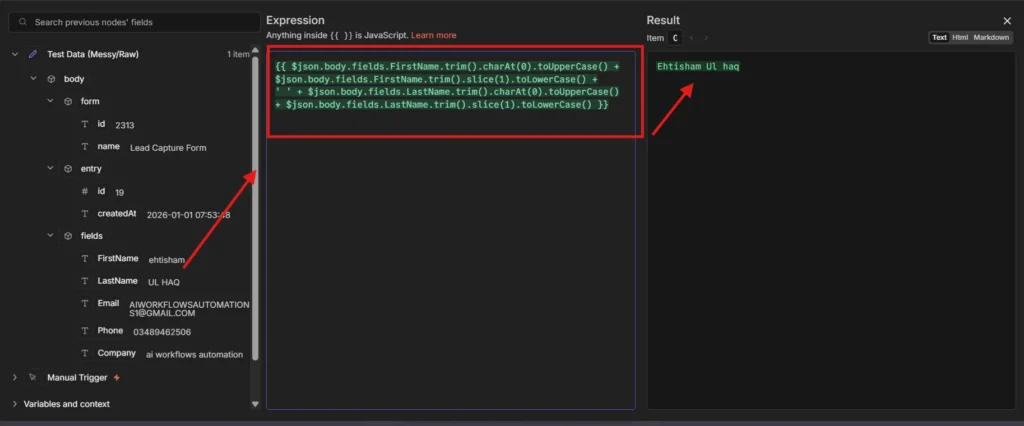
Transformation 1: Full Name
Combine first and last name with proper capitalization.
Expression:
javascript
{{ $json.body.fields.FirstName.trim().charAt(0).toUpperCase() + $json.body.fields.FirstName.trim().slice(1).toLowerCase() + ‘ ‘ + $json.body.fields.LastName.trim().charAt(0).toUpperCase() + $json.body.fields.LastName.trim().slice(1).toLowerCase() }}
What it does:
- .trim() removes extra spaces
- .charAt(0).toUpperCase() capitalizes first letter
- .slice(1).toLowerCase() makes rest lowercase
- Combines with a space in between
Result: ” ehtisham ” + “UL HAQ ” → “Ehtisham Ul haq”
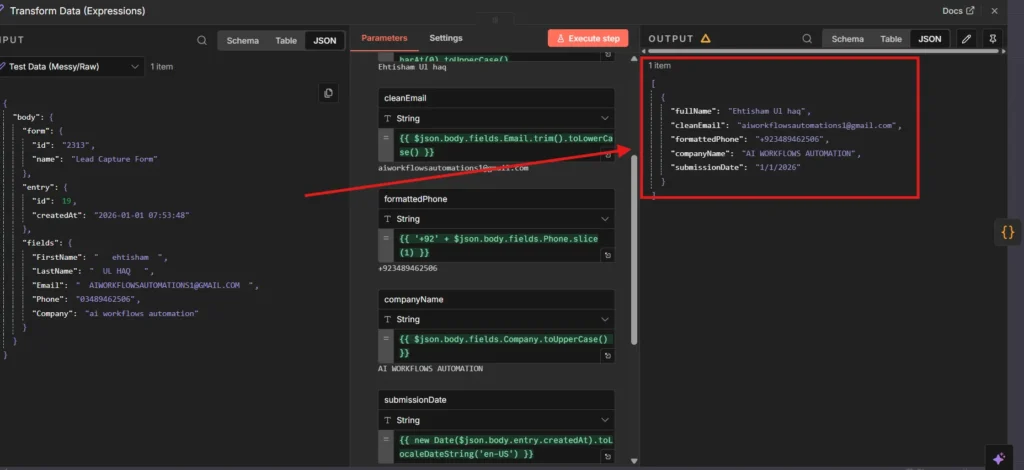
Transformation 2: Clean Email
Expression:
javascript
{{ $json.body.fields.Email.trim().toLowerCase() }}
Removes spaces and converts to lowercase. Simple but effective.
Result: ” AIWORKFLOWSAUTOMATIONS@GMAIL.COM ” → “aiworkflowsautomations@gmail.com”
Transformation 3: Formatted Phone
Expression:
javascript
{{ ‘+92’ + $json.body.fields.Phone.slice(1) }}
Removes the leading zero and adds Pakistan’s country code.
Result: “03489462506” → “+923489462506”
Transformation 4: Company Name
Expression:
javascript
{{ $json.body.fields.Company.toUpperCase() }}
Standardize company names to uppercase for consistency.
Result: “ai workflows automation” → “AI WORKFLOWS AUTOMATION”
Transformation 5: Submission Date
Expression:
javascript
{{ new Date($json.body.entry.createdAt).toLocaleDateString(‘en-US’) }}
Converts timestamp to readable date format.
Result: “2026-01-01 07:53:48” → “1/1/2026”

Execute this node. Check the output—your messy data is now clean!
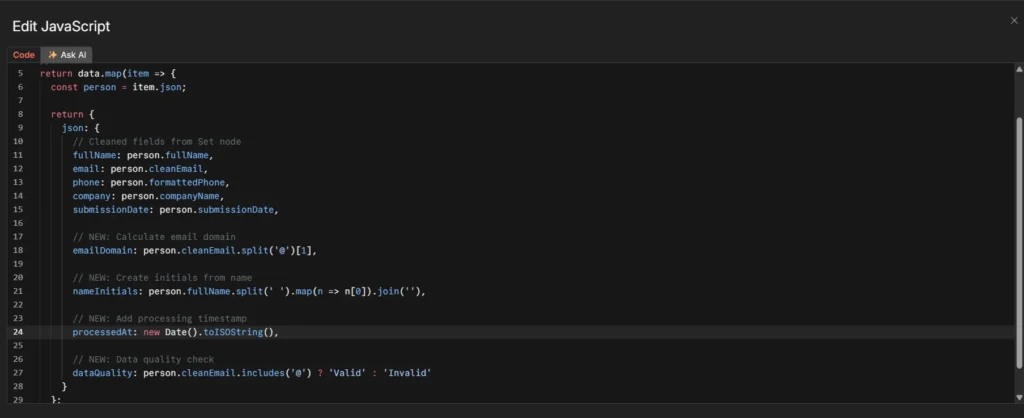
Step 4: Advanced Transformations (Code Node)
Sometimes expressions aren’t enough. The Code node gives you full JavaScript power for complex calculations.
Add a Code node called “Advanced Transformations.”
This code adds four new calculated fields:
javascript
// Get data from previous node
const data = $input.all();

// Transform each item
return data.map(item => {
const person = item.json;

return {
json: {
// Original cleaned fields
fullName: person.fullName,
email: person.cleanEmail,
phone: person.formattedPhone,
company: person.companyName,
submissionDate: person.submissionDate,

// NEW: Extract email domain
  emailDomain: person.cleanEmail.split('@')[1],

  // NEW: Create initials
  nameInitials: person.fullName.split(' ').map(n => n[0]).join(''),

  // NEW: Add processing timestamp
  processedAt: new Date().toISOString(),

  // NEW: Validate email quality
  dataQuality: person.cleanEmail.includes('@') ? 'Valid' : 'Invalid'
}
};
});
What surprised me here: n8n’s Code node is incredibly powerful. You get full JavaScript access but it’s still visual and easy to test. Way better than writing separate scripts.
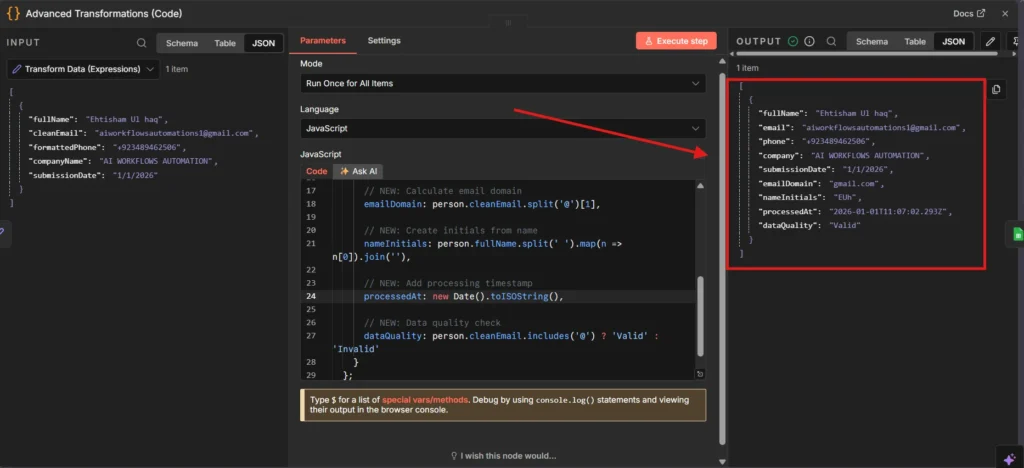
Execute and check the output. You’ll see your original fields plus four new calculated ones.
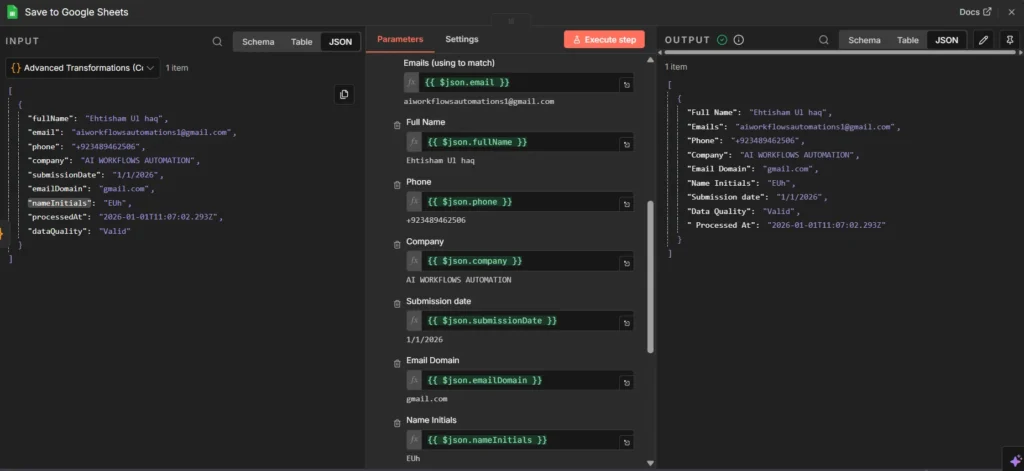
Step 5: Save to Google Sheets
Add a Google Sheets node. Configure it to save all nine fields:
Column Mappings:
- Full Name: {{ $json.fullName }}
- Email: {{ $json.email }}
- Phone: {{ $json.phone }}
- Company: {{ $json.company }}
- Email Domain: {{ $json.emailDomain }}
- Name Initials: {{ $json.nameInitials }}
- Submission Date: {{ $json.submissionDate }}
- Processed At: {{ $json.processedAt }}
- Data Quality: {{ $json.dataQuality }}
Set “Matching Column” to Email to prevent duplicates.
When to Use Expressions vs Code Node
Use Expressions when:
- Simple string manipulation (trim, case changes)
- Accessing nested data fields
- Basic math operations
- Date formatting
Use Code Node when:
- Complex calculations needed
- Multiple operations on arrays
- Conditional logic beyond simple ternary operators
- Creating new data structures from scratch
I spent 15 minutes trying to build the initials logic with expressions before switching to Code node. The JavaScript version took 30 seconds to write and actually works.
Common Issues and Solutions
Issue: “undefined” in Output
This happens when field names don’t match. Check the INPUT tab of your previous node to see the exact field structure.
Fix: Use the expression editor’s field browser (click the field icon) to select fields visually instead of typing.
Issue: Expression Syntax Error
Forgot the curly brackets? Expressions must be wrapped in {{ }}.
Wrong: $json.name
Right: {{ $json.name }}
Issue: Can’t Access Nested Data
Use dot notation for nested JSON.
Example: {{ $json.body.fields.FirstName }} accesses FirstName inside fields inside body.
Real-World Use Cases
E-commerce Order Processing:
Clean customer names, format addresses, standardize phone numbers before sending to fulfillment system.
CRM Data Import:
Transform exported data from one CRM format to match another CRM’s requirements.
Lead Generation:
Clean form submissions from multiple sources into a single standardized format for your sales team.
Invoice Generation:
Format customer data properly before creating PDF invoices.
Download the Complete Workflow
Want to skip the manual setup? Download the ready-to-use workflow JSON and import it directly into your n8n instance.
📥 Download Contact Form Data Processor Workflow (JSON)
How to Import:
- Download the JSON file above
- Open your n8n instance
- Click the “+” menu → “Import from File”
- Select the downloaded JSON file
- Update your Google Sheets credentials
- Execute and test!
The workflow includes:
- ✅ All 5 nodes pre-configured
- ✅ Test data with messy examples
- ✅ Expression formulas ready to use
- ✅ Code node with advanced transformations
- ✅ Google Sheets integration setup
Note: You’ll need to reconnect your own Google Sheets credentials after importing. The workflow structure and all expressions will work immediately.
Next Steps
Now you know how n8n expressions work. Start with this workflow, then customize it for your data sources.
Related tutorials:
- [Post #4: n8n Credentials Management] – Connect to Google Sheets securely
- [Post #5: HTTP Request, Code, and Set Nodes] – Deep dive into node types
- [Post #6: Error Handling] – Make this workflow production-ready
Want to add AI-powered data enrichment? Check out the upcoming tutorial on integrating ChatGPT with n8n workflows.
The patterns we used here—accessing data with {{ $json.fieldName }}, using string methods, combining Code nodes with expressions—work everywhere in n8n. Master these and you can clean any data that comes your way.